-->

Featured Posts Coolbthemes

Pages


Hey guys today we are here with a great trick. From this trick you will be able to download paid apps free from play store. Well downloading paid apps free directly from play store is not possible as we guess it was done in past but not possible now because Google has fixed vulnerabilities in Play Store but there are some methods still alive that work similar. Now you can get paid apps free without any kind of hack at all. So guys let's go for simple trick.


Steps to Follow : 

Step 1 : Download Get Apk Market  and Install it on your device.

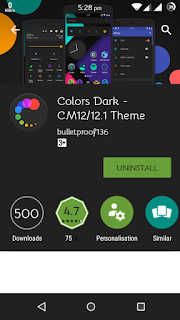
Step 2 : Open play store and search for the app you want to download.


Step 3 : Now scroll down and click on Share button.


Step 4 : Now Select GetApk Market.


Step 5 : Now wait until it load. 


Step 6 : Click on Get to download app.

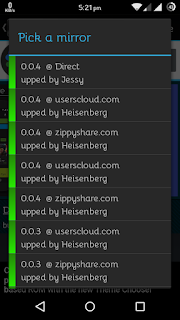
 Step 7 : Choose any green colored Mirror


Step 8 : Wait until it loads if it takes longer time than click on "Open in Browser" 


Step 9 : Wait for a few seconds and skip Ad than you will be redirected to download page.


Step 10 : Download your app and install it.


Step 11 : Now enjoy your paid app for free :)


If you are having any trouble in any step then leave your precious comments for us :)
Read More
Hey guys, today we are going to talk about Phishing. 


Phishing (pronounced "fishing") is a type of online identity theft. It uses email and fraudulent websites that are designed to steal your personal data or information such as credit card numbers, passwords, account data, or other information.
Millions of fraudulent email messages with links to fraudulent websites that appear to come from websites you trust, like your bank or credit card company, and request that you provide personal information comes in your mailbox. Criminals can use this information for many different types of fraud, such as to steal money from your account, to open new accounts in your name, or to obtain official documents using your identity.

What to do when you thinks that you're targeted :- 

If you suspect that you've responded to a phishing scam with personal or financial information, take these steps to minimize any damage and protect your identity.

  1. Change the passwords or PINs on all your online accounts that you think might be compromised.
  2. Place a fraud alert on your credit reports. Check with your bank or financial advisor if you're not sure how to do this.
  3. Contact the bank or the online merchant directly. Do not follow the link in the fraudulent email message.
  4. If you know of any accounts that were accessed or opened fraudulently, close those accounts.
  5. Routinely review your bank and credit card statements monthly for unexplained charges or inquiries that you didn't initiate.

How to check website's true identity


In Internet Explorer, the domain name in the address bar is emphasized with black type and the remainder of the address appears gray to make it easy to identify a website's true identity.


Identify fake web addresses

Check the email Carefully
A phishing email may claim to be from a legitimate company and when you click the link to the website, it may look exactly like the real website. Sometimes, the link may lead you to the privacy policy of the legitimate company or some irrelevant pages. The email may ask you to fill in the information but the email may not contain your name. Most phishing emails will start with “Dear Customer” so you should be alert when you come across these emails. You should know that a legitimate company will not send spam emails. The email may contain the names of fictional personnel who supposedly work in the legitimate company. For instance, you may have received an email from Mr. Carey Parker who’s the CEO at some big company telling you that you have won $3 million. If you want to find out if there’s really such a person working in such a company, you can contact the real company directly. Don’t call the number which is provided in the email. These emails may have an alert notice for a quick response but you must know that it’s just another ploy to get vital information.
Never Enter Financial or Personal Information
Most of the phishing emails will direct you to pages where entries for financial or personal information are required. An Internet user should never make confidential entries through the links provided in the emails.
Identify a Fake Phone Call
Phone phishing is the method in which a phone call is made to the user for the purpose of stealing personal information. For instance, the user may be asked to provide financial details for the refund of money to an account. The phone call may come from a number which appears legitimate but the area code in the phone call can be modified using VOIP  technology.
Protection through Software
Anti-spyware and firewall settings should be used to prevent phishing attacks and users should update the programs regularly. Firewall protection prevents access to malicious files by blocking the attacks. Antivirus software scans every file which comes through the Internet to your computer. It helps to prevent damage to your system.
Never Send Personal Information through emails
Never send an email with sensitive information to anyone. Make it a habit to check the address of the website. A secure website always starts with “https” or a lock before the url
Check Bank Details Regularly
To prevent bank phishing and credit card phishing scams, you should personally check your statements regularly. Get monthly statements for your financial accounts and check each and every entry carefully to ensure no fraudulent transactions have been made without your knowledge.
Never Download Files from Unreliable Sources
If you get a message stating a certain website may contain malicious files, do not open the website. Web browsers provide settings to prevent access to malicious web pages and when you try to access a malicious site, an alert message will appear. Never download files from suspicious emails or websites. Even search engines may show certain links which may lead users to a phishing webpage which offers low cost products. If the user makes purchases at such a website, the credit card details will be accessed by the phishers.
Read More

Hey guys, today we are here with a trick for a small problem that was faced by any unknown person who visited our website to downgrade his/her LG G4 back to lollipop 5.1.1. We are thankful to him for sharing his problem with us and for him and other LG G4 users we are here to fix an error after downgrading the phone. The unknown user told us that he is finding an error on rebootin his phone and the error was "Current version is not available for user. Can't find matched cust for NT-Code MCC/MNC[FFFFFF],SUBSET[56]".


So guys if you are having any this type of error like above on rebooting then don’t be feared about that as all these errors comes because the firmware are made different for different countries and you are probably using an international firmware. It’s a simple trick to correct the error and I know that error annoyed you a lot but from now you are going to be free from this error.


Note :- According to your firmware you could see any error of the type above but the error is same if it appers like "Current version is not available for user. Can't find matched cust for NT-code MCC/MNC[XXXXXX],SUBSET[XX]",i.e., there could be anything instead of ‘X’.

Let’s begin the trick :)


Requirements :


* Root Access in your LG device.
* ES File Explorer App


Steps to fix the error :


* Open ES File Explorer app.
* Go to the “root” folder of your device.
* Search and go to the "Cust" folder.
* Open the "cust_path_mapping.cfg" file with “ES Text Editor”.
* At the top(or bottom), give a space to add a new line.
* Type the following : XXXXXX,XX=/cust/OPEN_IL. ( Replace the characters of your own like for the unknown user the characters are “FFFFFF,56=/cust/OPEN_IL”).
* Now, save the file.

Note :- You may be asked to enable Read-Write capabilities, so allow the ES File Explorer to do so.
* Now reboot your phone and get rid of that annoying error.

Remember :- As I told you firmware is different for different countries, so in case if your are using a European device, and the above edited character does not work, then just replace "OPEN_IL" with "OPEN_EU" and for US devices replace with “OPEN_US” and so on. One mor thing I want to tell LG users that LG G3 users can also use same process to fix this error.


That’s it guys enjoy with your phone and be connected with us and give your precious comments to us :)

Read More

Hey guys, today we are going to guide you that how can you flash a custum ROM in Asus Zenfone 5.
In the recent days I tried two ROMs : Resurrection Remix and Cynogen Mod 12.1. I found many bugs in Resurrection Remix like Play Store was not working, apps automaticallly stops and it takes too much time to start up again but I'm doing well with Cynogenmod 12.1. 

So without wasting your too much time we are here with our steps :

For Resurrection Remix :


Requirements : 


Step 1 : First of all you have to charge your battery nearly full and your phone must be rooted (if not then see How to Root Your Asus Zenfone 5).

Step 2 : Download all files listed above and place Gapps, Resurrection Remix and Xposed Installer in your SD Card and Extract Platform Tools to Desktop of your pc.
Step 3 : Place the downloaded TWRP Recovery Zip in Platform Tools Folder and extract it and copy recovery.img from files in Platform Tool Folder. 

Step 4 : Open your mobile in droidboot mode. First Power off your device then Press Power button and Volume Up button together and connect your phone to pc.

Step 5 : Now open Platform tools folder and press SHIFT + Right Mouse Button and select open command window here

Step 6 : Then type fastboot flash recovery recovery.img then hit enter.

Step 7 : Now select recovery mode then press Power button to select.

Step 8 : Then TWRP Recovery will be opened and from this backup your all data to SD Card and then select Install Option and select external sd from the list appears.

Step 9 : Now, Select Resurrection Remix Rom and swipe to install and after installing it install Gapps and Xposed Installer.

Step 10 : After that wipe cache/wipe dalvik cache and then go to Wipe option and factory reset your mobile and then go to the Reboot Option and Reboot System. 

Starting in first time takes more than 10 minutes after starting register yourself and enjoy with your newly installed Resurrection Remix.

For Cynogenmod 12.1 :


Requirements : 


Step 1 : First of all you have to charge your battery nearly full and your phone must be rooted (if not then see How to Root Your Asus Zenfone 5).

Step 2 : Download all files listed above and place Cynogenmod 12.1 Unofficial and Xposed Installer in your SD Card and Extract Platform Tools to Desktop of your pc.
Step 3 : Place the downloaded TWRP Recovery Zip in Platform Tools Folder and extract it and copy recovery.img from files in Platform Tool Folder. 

Step 4 : Open your mobile in droidboot mode. First Power off your device then Press Power button and Volume Up button together and connect your phone to pc.

Step 5 : Now open Platform tools folder and press SHIFT + Right Mouse Button and select open command window here

Step 6 : Then type fastboot flash recovery recovery.img then hit enter.

Step 7 : Now select recovery mode then press Power button to select.

Step 8 : Then TWRP Recovery will be opened and from this backup your all data to SD Card and then select Install Option and select external sd from the list appears.

Step 9 : Now, Select Cynogenmode 12.1 Unofficial and swipe to install.

Step 10 : After that wipe cache/wipe dalvik cache and then go to Wipe option and factory reset your mobile and then go to the Reboot Option and Reboot System. 

Starting in first time takes more than 10 minutes after starting register yourself and enjoy with your newly installed Cynogenmod 12.1 Unofficial.


Note : Both Resurrection remix and Cynogenmod 12.1 looks same because the Resurrection Remix is based upon the Cynogenmod.


If you are facing any problem in the above steps then you can reach us by comment or contact form. We would love to help you :)
Read More

Hey guys, a few days before when I was trying to unroot my Asus Zenfone 5 it just stucked in between and it did not opened till 15 minutes was over then I came to know that there is a bootloop in my mobile.

Then I worked on it more than 5 hours and made my phone perfect but I lost my all data and contacts from my internal memory. So if you  get in this problem anyhow you will not suffer for more than 30 minutes if you folly this tutorial. I am providing you the simple and best steps and you can be able to recover your all data from your internal memory. So be patient and trust me it is as simple as rooting a phone via pc.

You will need some files to be downloaded to perform the work :


So here are the steps that you have to follow to fix bootloop in your Asus Zenfone 5 : 

Step 1 : Extract Platform Tools to Desktop.

Step 2. Copy UL-ASUS_T00F-WW-2.22.40.540-user (1).zip in the Platform Tool folder.

Step 3 : Download TWRP Recovery and extract it and copy recovery.img from files in Platform Tool Folder. 

Step 4 : Open your mobile in droidboot mode. First Power off your device then Press Power button and Volume Up button together and connect your phone to pc.

Step 5 : Now open Platform tools folder and press SHIFT + Right Mouse Button and select open command window here

Step 6 : Then type fastboot flash recovery recovery.img then hit enter.

Step 7 : Now select recovery mode then press Power button to select.

Step 8 : Then TWRP Recovery will be opened and from this backup your all data to SD Card and then Power off the phone again.

Step 9 : Now delete TWRP recovery.img from the Platform Tool Folder and open UL-ASUS_T00F-WW-2.22.40.540-user.zip and copy recovery.img from it to the Platfom Tool Folder.

Step 10 : Follow Step 4, Step 5, Step 6, Step 7 again.

Step 11 : Now a recovery window will open showing a android symbol written below No Command. You have to press both Volume Up + Volume Down Button together then an option window will appear.

Step 12 : Now select apply update from adb and then in the command window type adb sideload UL-ASUS_T00F-WW-2.21.40.44-user.zip and leave it until it sends the file to the phone.

Step 13 : After few minutes you will see a message to reboot your phone then reboot and enjoy with your phone.

Note : The TWRP recovery is only used to backup your data if you do not wish to do so then just leave that portion.

Thanks for visiting our blog. If you are getting any difficulty then comment us we are here to help you :)


Read More
Related Posts Plugin for WordPress, Blogger...

Recent Posts

Hackers Tools

Contact Us

Name

Email *

Message *

Translate

Back to Top

Followers

Back to Top

Total Pageviews

©Cppyright Amazing Hacks...- All Rights Reserved.